Popular Posts

Wednesday, December 28, 2016

Christmas MOC collaboration: Inquisitor

 Merry Christmas-ish... ok so it's post Christmas, but I'm chilling at home with my youngest brother and we didn't want to watch Revenge of the Sith after Rogue One like the rest of the family so a collaboration was undertaken to make the most of an evening not spent upstairs.

We call it... looks at bro for a name...
Anythink&Everythink (Bro's Instagram handle): The White Knight...
Cure-all Pill: that's lame...
Any-etc.: Collabron?
Cur-etc.: eh...
Any-etc.: the Spaceship.
Cur-etc.: No.
Any-etc. The x-wing canopy spacething...
Cur-etc.: ... that's trademarked.  I propose Walpurgisnacht GTV8-2000
Any-etc.: (one google search later) That's dumb.
Cur-etc.: Inquisitor, Vindictor, Remediator: Radiator... Inquisitor?

After a long time we chose: Inquisitor


The central cockpit was my brothers job and I built the right engine without seeing it, and the left engine when the rest was finished.


The yellow accent was chosen strictly because I had a limited selection of long antenna colors... Ice planet orange, dark bley, and yellow (which offered the best color pop).  after that we found ways to sneak in more yellow.


The underside of the cockpit is the cockpit canopy in white braced up by a clip (also holds the insufficient landing gear), and limited in space and studs... to be clear... there aren't any.


I would have most likely trashed the cockpit at this point... but I turned around and my bro had found a way to brace his figure inside.


I suggested attaching the console to his feet and the result was born.


The design is off center and asymmetrical, partially by intent... and um... because the collection wouldn't have it the other way.  Necessity is the mother of invention.  I like to think the rear engine on my bro's cockpit is a compensatory thruster to help with counterbalancing the larger engine.


Two years ago I showed my brother how I sort Lego elements when facing storage constraints and he has expanded it based on my philosophy of shapes.  Overall the MOC took 1.5 hours to assemble.  We finished it inside the run-time of Revenge of the Sith.

Happy holidays, and until next time, Cure-all Pill

Tuesday, November 22, 2016

Futuron: 6953 Cosmic Laser Launcher Alternate 1: Space Saucer

Due to connector wear and tear I've run into a hitch getting more than 5 photographs off my phone every other day... it's been a bother, especially since I keep forgetting and I have to make sure I don't upload the same photo twice.  So that's my unhelpful excuse for the long and languishing Battrax Review.

How about something fun? a long awaited post for another Futuron Alternate.

This time I'm tackling Cosmic Laser Launcher's Alternates,  If you follow that link you'll notice that my photography skills and camera have improved considerably since those halcyon days of my first wave of reviews.  I should update this one when I have time.


The first model out the gate is a fancy low slung fighter with a massive footprint.


I chose this example to start off with for two reasons.
First: It's my favorite idea on the back of the box, I'm drawn to the use of the giant window, the reaching mandibles, and the burly engines.  Lots to like at a glance.
And the second reason is that it's a spaceship, and I felt like building such a wonder tonight.


The structure and image presented a few quandaries.  Firstly, I cannot see the bottom, nor can I see the astronauts seating.  So I assembled what I could see and did improvise after getting a glimpse at the remaining part palette,  I opted for the rounds as landing gear even though I couldn't see them.  I felt they were needed for substructure support alongside the inverse slopes and the hopefully correct 1x3 bricks. A second glance at the box made me think the 1x3's should be 2x2 inverted slopes... whoops.


The first surprise with this model was related to its size, I knew it would be long, but the image is presented to look slender, and lest we all forget how wide those angle plates are... it is not a slender ship.  With a few adjustments this could be a competent saucer.


The plate laden construction doesn't inspire confidence in the craft's rigidity, and the lightness of the frame suggests the ship is frail, though it does hold together well.  It is a bit thin looking to my tastes, more undercarriage would be a good addition, but the parts for such an embellishment are not contained within the main model.  From this angle it looks rather good, the illusion of depth does wonders for the presentation.


I'm reminded that this is not a new toy by the yellowing of certain white elements, and the occasional dent or marred surface... that aside and more to the point, I really like the inclusion of the red spacemen here, I'm at a loss why TLG didn't include them in more sets... The cockpit here doesn't help to allay concerns about the craft's spindly construction, but it does offer an excellent grip point for swooshing; this is a very important play feature in a toy spaceship... especially one as wide as this model is.


I'm rather less pleased with this alternate in my hands than I am with its vision of loveliness upon the box, it's tempting, but wholly underwhelming almost entirely on account of the flat nature of the main body, there's a certain, this could never have been an official model, feel to it that bothers me.

I just noticed the 1x2 slope missing on the left mandible.  I'm not going to fix it... I'm not, but... pfft, I thought I caught that yesterday?  Anyways... I've made a handful of mistakes in assembling this, but I'm letting them go... fixing them with my current camera setup will be a 2 day bother, and I'm not willing to make the adjustments.  But I'm telling you so you don't accidentally take my iteration as the end all be all on the matter.

Here's a competent saucer composed by rotating the two big plates, and pulling the mandibles back, Since the mandibles aren't an exact match I removed one 1x4 plate from the back wing of the model to keep things balanced.  The grille prints look to be decent heat dispersal points ahead of those engine lasers.  I think the main design has great potential for a more built up rehash, but I'm really pleased at how simple it is to make flying saucers from this set.


You may have noticed the new background color... I saved some matte black... well it's not construction paper... thicker... I saved sheets of unknown material from going to the garbage at work. I figured the Futuron sets might look better on a nonwhite background and it was free 99.  On that note it's time to end this installment; until next time ~The Cure-all Pill

Monday, August 22, 2016

Request for my Blacktron Insurgent Secrets

Reader Zoli requested to see how the quarter panels were attached aboard my MOC: 
Blactron Insurgent


Pardon the glare, I brightened it so the piece can be seen.  In the front I've got a recessed side stud brick 1/8th turned which seats in the recess under the airplane cockpit cowl brick.  I attach it beneath the cowl and then press down so it detaches and sits flush.  This isn't truly secured, but my method does keep it in place due mostly to the quarter dome's footprint.  (That's entirely conjecture)

Desperate times call for desperate methods and I say if it sits and sticks it fits. ;)


Here is where the magic happens. The red 1x1 dot holds the plate and round brick apart and 1/8th rotated.  Those are held by an L Bracket which sits attached on two studs.  I didn't have a lot of parts to work with and I know it might appear to be fragile, but whatever that recessed stud brick is doing internally under the cowl... it's rigid.  I would feel comfortable handing this to a kid to swoosh.


That is not something I can say for the dev work I did on my first cockpit for this ship.

You can't see it and I don't have a photograph of it to show... keep in mind this thing was destroyed to make something better, but the cockpit in this iteration is both fragile and stupidly tall next to the main hull.


The side panel was a Tie Interceptor inspired attempt.  Remarkably it worked... the cockpit on the other hand...
This formation wouldn't hold when lifted and was crumbly.  I almost scrapped the whole hull when I couldn't, at first, make the cockpit work.  None of you ever would have seen it, but thanks to Zoli distracting me... voila!  It's a thing, and it's my thing... ill advised though it may be.  I was getting very frustrated after the first hour or 2?


The idea has some merit, but it merits more pieces than 6894 Blacktron Invader provides.


I hope you found this helpful Zoli, and to everyone else, I hope you enjoyed this lookback under the hood of my spaceship.

Sincerely, the Cure-all Pill

Sunday, June 19, 2016

Blacktron: 6894 Invader

It has been a while since my last post... I've made great haste to get the Blacktron sets since January because believe it or not all my Blacktron men from previous posts were from the Space Police sets. So... as I was saying... I hurried through getting the sets and dragged my feet on acquiring the missing elements to make these things complete.  And I'm not quite done yet... but Invader is ready and all of the '87 sets will be ready shortly... So lets get it started.

We shall proceed systematically small to large year by year starting with 1987's selection.

Today that is the Invader.


This tubular rocket chassis is a segmented spacecraft designed to pair up with other members of the Blacktron gang.


Invader is composed of three stages.  These stages can be reconstituted with other Blacktron vessels to achieve a variety of shapes and purposes.  For now, let me show you the options provided here.


Rear Booster rocket with red solar panel wings.


This rear rocket unit has one of the uncommon grey elements of the theme used to propel the rocket based ship through space.  The panels can adjust to draw more light from the solar system's sun and help conserve power for as long as possible so as to extend operations deep into enemy territory.  The little eye stalks almost give it a little spy camera feel... so you could leave it floating above Futropia to plot the demise of the happy explorers.


The panels are on adjustable hinges and can be placed in more poses than the modern click hinge will provide, but lack the pinpoint placement accuracy.  There is also the problem for this style of hinge loosening with heavy usage.


Overall, the design of the rear module is simple enough, yet developed enough that its vagueness lends several possibilities to what exactly its uses may be.  It's at the perfect level of non-specificity to encourage various modes of play and imagination.

Payload


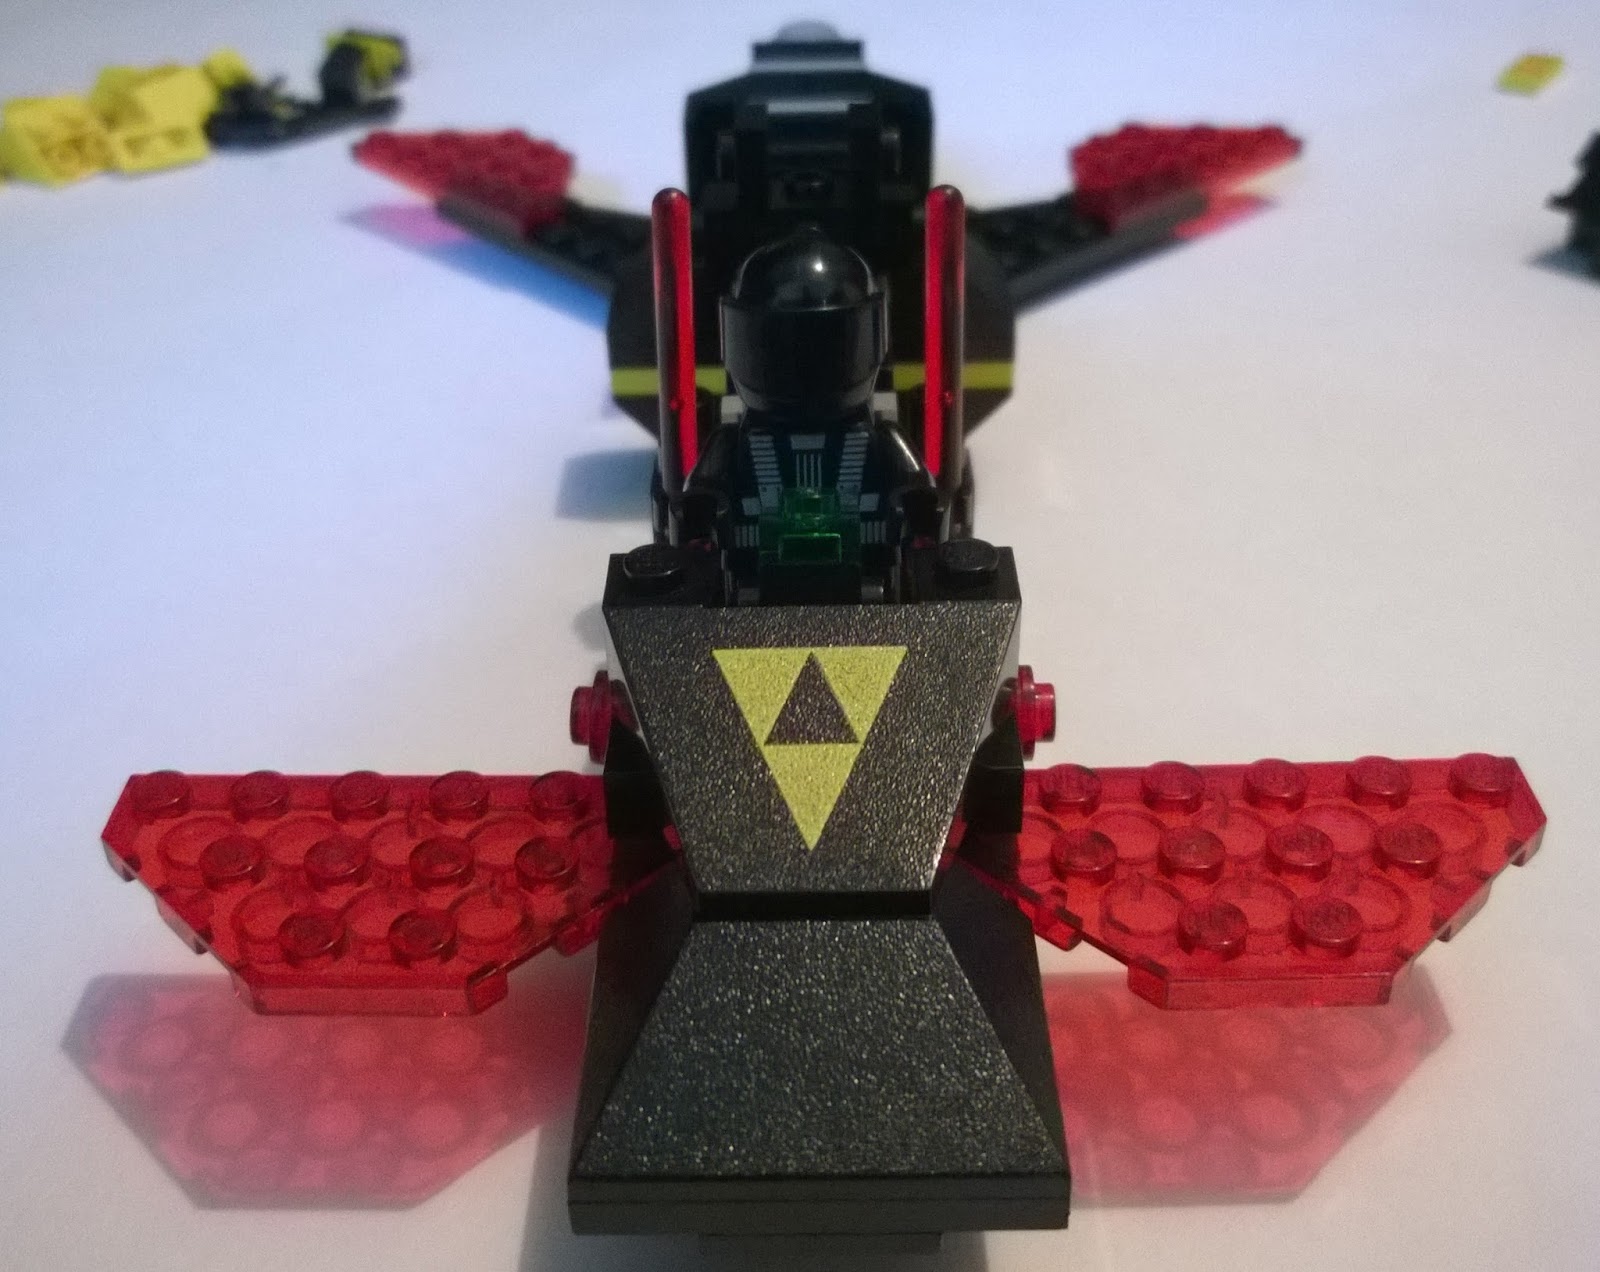
The central container displays the Triforce for all to see on the two castle wall/hull panels.


The top section displays the action arrow which compels us to open up the top and look inside.


Ultimately there's a small robot and a pair of tools, but for all the massive girth of the thing it is a frighteningly small load of stuff.


Attack craft

The front cockpit features a pair of heavy blasters, the triforce logo, and swing wings to form either a delta for speed, or a sweep for acrobatic maneuvers.


The cockpit rises quite far and has space in the back to carry the astronaut's tools if he must abandon his container.


The avionics are also quite developed.  The console is composed of both the slope and the tile to create an expansive interface for an elaborate array of flight modes, of which this craft has many.


Of special note is a throwaway part that you may overlook while examining this craft.  The cockpit build hides 1x1 trans green plates.  They baffled me when I first built this set as the color is used nowhere else in Blacktron gen 1 and offhand they feel incredibly out of place.  As I've thought about this more it's occurred to me that these maintain the pilot's night vision while lighting his console in the pitch black of an asteroid's shadow and the eternal night of open space.  It's night vision built into the avionics  That's one cool, elegant build solution.  And thanks to the magic of photo manipulation... what is imagined has been realized: Voila! Night Vision!


Here's a sensible reassembly based on the available options.  The craft retains its stabilizer dragonfly solar panels and its retractable swing wings give the craft a mean Tomcat impression.


Airspacemag: Swing Wing


If the enemy ship's lasers and armaments lock on the attack craft can jettison its rear and make like a gecko to get outta there!


When viewed as a model in images Invader can leave an unimpressive feeling of austerity, but in interacting with it I've found it to be everything I'd hoped for.  It was the first model I picked up from the Blacktron theme, and as a demonstration of the series gimmicks and thoughtful construction it may be the best.  Not to say the others aren't just as good... but the simple elegance of this model puts it in the same category as Stardefender 200 and Space Patroller... It's subtly tuned down to the placement of the last part.


So yeah... I dig this ship.

Of special elements there are a fair few both within the theme and overall.

The most obvious notable parts are the 2 castle wall's in black with the Blacktron print.  One of mine is knicked, but the prints are strong and the impact in context is evocative of the theme.  The Blacktron theme has several more of these in plain black.


The black arrow brick is a unique color, though the pattern is shared with a unique white brick in Futuron's Interplanetary Rover.


The black cockpit cover is an uncommon element color released from 1987-1998 across 4 sets... only the Invader provides it for the space theme.


1 The grey space chair has quite a spread in classic space with good representation across a few space themes.  This is the only example in Blacktron, which surprisingly enough does use spare amounts of grey as part of the color scheme.  This particular color is permanently out of production.


1 grey 1x1 round brick.  This is a pretty regular piece in the larger Space range.


2 grey 2x2 plates.


2 trans green 1x1 plates.  This element appeared frequently in Classic Space from beginning to end, but in Legoland Space this was the final hurrah... even Space Police II didn't reprise it.


4 trans red 1x1 tiles.


4 trans red wedge plates: this element had appeared just prior in equal quantity within Classic Space's final moonbase 6972 Polaris 1 Spacelab .  It made its only other appearance in 2002's Alpha Team deep sea theme.  Look for the 4788 Ogel Mutant Ray.


2 Trans yellow panels.  This color is unique to this set.


1 Yellow hinge top.  This color straddles the middle being neither exceptionally rare, nor exceedingly common.  For now, this is the extent of its presence in the Space range.


1 yellow 2x3 plate.  This part would appear again in 1997's 2154 Robo Master and in 2009's 5972 Space Truck Getaway.  It's not a space regular, but is otherwise quite common.


1 yellow 4x4 plate Here is another common yellow element which has no other presence in the Space range.


4 yellow inverted slope 1x2 45 degree.  And this is unique in the Space range


4 yellow inverted slope 2x2 45 degree.  And this common piece is also unique in the space range


It's a good thing the main model is so dang appealing because the alternates presented for this set are not.  I think my dislike stems from the disuse of the big parts.  The options shown are limited by the use of space to demonstrate how the toy's sections may be re-combobulated.  There is a limit to how much space is on the back of the box... and this is one time when I am not feeling inspired by what I see.


So great is my dissatisfaction... I have built them to express to you... just how bad these are.

For example: option 1... note the unused trans yellow, and the unused castle walls.  The designers apparently wanted to show off the transparent red half octagons... but their first solutions weren't exactly awe inspiring.


The slick engine is actually kinda great, but it trails off from the lazy brick stacking of the rest of this rocket sled.
I do like the contoured nose


Option 2 is better... I still think it has a poor middle, but the front area's kinda nifty looking.  And yet the canopy and walls still don't get their proper due.


The rear of the model, and the area under the wings required the process of elimination to determine what goes there.  Consequently my reverse engineering may be imperfect.  But I'm rather pleased with my placement of the service robot that stands below the ship.


Again, the middle is a tepid affair, but it kinda looks like a fish now.


And there's the little droid.  I like the droid.  It's a good simple design with a bit of character imparted to it by the wrench.


So at least one of these models is better than it seems...

I guess I gotta show off the parts I'm griping about though, so here goes.

My first attempt at the cockpit shattered into many pieces due in most part to all the major pieces going into the hull... and a weak sidewall mount point.... and after a sort of... escape to do other things I came back and tried one more time.


I had to beef up the cockpit mount point to the cargo hull/ enormous rocket engine/turbo laser battery just so I could pick it up with one hand.  Now I can pick it up at many points and swoosh it with no fear of catastrophic failure.


This wouldn't be a good back of the box model as far too much of it is obscured, and I've made one or two interesting connections... so to speak.  I kinda like it.  I call it the Blacktron Insurgent.


As my introduction proper to the well regarded Blacktron series Invader did not disappoint.  In fact... In building the various Blacktron sets after all the other themes: Futuron, M: Tron, and Space Police... I totally underestimated the appeal of this theme from looking at pictures of them.  Invader in particular is one slick spacecraft.

Overall score: A
Pros: Excellent main model, good selection of unique prints and colors, wide selection of parts. Blacktron minifig. Combines readily with other Blacktron sets.
Cons: The box alternates do not do the model justice. Robot is prone to toppling.