Popular Posts

Friday, December 25, 2020

A Spaceship Holiday Special

I haven't built an M:Tron Moc all year... 

I like the theme, but whenever I'm building, I tend to gravitate toward builds that use trans red, trans blue, or trans yellow...

poor M:Tron.

So earlier in the year as summer began I built a Futuron cough... but I'm getting ahead of myself... I built a Classic Space A-Wing... 

The Classic Space color scheme was borrowed from 6820 Starfire 1 


which in my opinion looks similar to the above water color scheme of the Seatron development theme I based my modular shapeshifting MOC on.


At this point it was not pure A-Wing design, it was the idea of an A-Wing in service to my own Lego Space idea.  I added lots of rockets.


Variant 2 became the first of my 3 takes on a Futuron A-Wing.  For this version I kept the base model the same, swapped in or added some trans blue or tastefully selected trans red, and used the 6990 extended cockpit for my cockpit choice.  I also swapped out the classic blue astronaut for a blue futuron astronaut.


I replaced the Starfire 1 V print with the Classic Space moon print that had some distribution on regular slopes in Futuron... I've always thought it was a good Futuron print, by themselves the stripes don't say quite as much as a good moon print does.  In my opinion, this still didn't capture the A-Wing flavor.

Enter Futuron variant 2  As you can see, I shortened the cockpit and completely redid the nose to get the A-Wing nose with the central split in the front. I changed the armaments to a more Starwars esque build style, less emphasis on transparent elements, more emphasis on a heavy firepower look.  I also removed the rockets and revisited the tailfins which had been part of the initial design.


In place of the rockets I went for more obvious A-Wing styling in the rear.

Here's a topdown view... I think the shaping was quite perfect at this point, and a forum viewer asked if I'd change the window to the blue one matching the red one... soo


I revised the design further... maybe he just wanted the window changed... but I took the opportunity to make further improvements.  I brought in more slopes, and returned some of the rockets to simulate the A-Wing's flattened football curvature.  I think the design really flows from this angle.


I haven't really shown off the interior up to now, here's the one photo I took for it.

So, you might be asking... why show off a Futuron A-Wing if you led with I haven't built an M:Tron MOC...


Well, I decided to build a B-Wing, and what got me on that mental track was that I'd built an A-Wing and I liked the result.

So, to get back to my longwinded story.  

Here's an M:Tron B-Wing and the still assembled A-Wing.  I built the B-Wing on Christmas Eve... to answer the call I kept giving myself... Build again, build again!


The design is vaguely like the very first 2000 B-Wing, but I only looked at it as I was wrapping up to see if the extending foils should have more lasers on them.  Otherwise I was building off memory of catalogue photos, and the Jangbricks review for it, that I watched recently.  

So, before I show it off I wanna brag on my solution... see, the cockpit swivels as a solid body front and back unobstructed by the arm leading into the main craft... and for a while I was trying to use the Particle Ionizer cockpit for my design, but with the efforts to get the rotating body, and the limited attachment points for the window I was looking at the bottom of the cockpit falling off with each rotation.  And the window was too long, which meant the body either had to be bigger than reasonable relative to the wing assembly, or featherlight, with only a few pieces to it.  After about an hour I changed the window choice for the prefab half octagon piece from Vector Detector.  It's a bit too open by Star Wars standards... but for Legoland Space, I think it's perfect.  

And that brings me to my solid rotating cockpit solution.  Since the Legoland Space theme didn't have 1x2 bricks with axleholes for easy front and back stiff attachments, I didn't use them here.  Instead the front and rear have plates pressed onto the side of the technic bush that can receive studs.  Then I built up the space around the plate with standard bricks.  I did this in the front and left it exposed to slot in the lowered cockpit, and it's buried inside in the back.  You can also see I've left a wrench for our astronaut to use on those necessary repairs.


I had a grand scheme to have magnets hold the foils out in the extended formation, and it dragged out the design troubles for 2 hours.  I eventually realized the magnets didn't fit, made the wings too heavy, and... the hinges had enough strength to hold position without the magnets.  So I ditched the magnets for the foils.  I still think it would have been cool if I could have made it work... but I think I'd need to make the model bigger, and I wanted it to be close to the first B-Wing's scale.


I did get M:Tron magnetized boxes on the ship though... and then I thought... but where will the engines go?  Soo, I pulled out the grey cups from Particle Ionizer... and I think they look really splendid.


For accent I added a few turntables to give the impression of a partially exposed mechanism turning the cockpit.

I had made a design decision early in the main body that gave me a SNOT opportunity, soo... I have an M:Tron logo slipped in on the bottom? of the fuselage.  Still using Legoland era parts.  You can see the fence inside attached to an eyelet plate... and I originally had a fence on either side of the eyelet plate, 


To get it positioned for the upside down studs I stepped the eyelet plate on a 1x1 plate into the back of these headlight bricks.  you can see the placement because it's the spot where I mounted my spare astronauts wrench


And tada... one upside down M:Tron printed slop tucked away... so the B-Wing has an M on the central fuselage no matter which way is up.

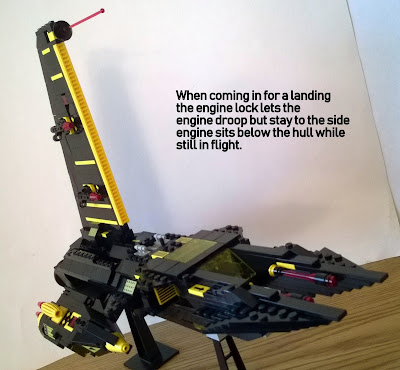
I was wondering how I would photograph the fully deployed engineering, but... cue 1 monorail stanchion to the rescue!  Sweet B-Wing posturing, and I'll see myself out.


Merry happy Holichrismakwanzonukah to all a ya.  

Sincerely the Cure-all Pill.


Saturday, July 11, 2020

Movie Night: Re-Imagine Seatron Instructions

I've seen a fair few Lego instruction videos on Youtube and thought I'd give it a shot, not least of which, I've had 2 people ask me to make videos and I told them no, I've recorded and listened to my voice... and I have a voice made for digital text.  You'll notice I don't say a word in this video.😐

Comments are disabled for the kids, but hop on over to the Futuron of My Youth Facebook page, or drop a comment here if you wanna give a shout. 

For Experiment 1 I loaded up the ole instruction photos I'd already produced and set up a video for the Seatron Spaceship.  You can also find the individual slides on the Facebook page linked above, just look in the Futuron of My Youth photo albums.  I've also recently added a Ninjago Kai Fighter Inspired Space Police instructional album at the request of several folks on Facebook.  I used a similar style as this and it's what got me pondering starting this idea as an infrequent  but fun way to continue producing things for the blog without buying more Lego.


If you make a request for content related to my content, I may not get to it, due to lack of time, lack of proper equipment, lack of technical expertise, or  just my own personal disinterest, but I'll usually file it away as a generative idea for later. 
I do kinda like making instructions, so if you see something I've made and want to build it... as long as I've still got it built, and I've got the time I can definitely pursue these sorts of requests.


Thanks for visiting

Sincerely, The Cure-all Pill

Tuesday, April 28, 2020

Blacktron MOC: The Mantis

Over Christmas I was given a present.

Star Wars Jedi: Fallen Order

Short review:
It was pretty good; I'd liken it to a Tomb Raider/From Software amalgamation
The combat at the highest difficulty was very satisfying
But eventually I wore down because progress was arduous and so I switched the difficulty down to the normal mode and the combat lost its luster at the easier setting, but I got to enjoy the story which I liked quite a lot.  I liked fighting Imperials and hated fighting spiders.
There's a nice looking spaceship in it called the mantis that inspired me to try some stuff with these Vintage 1980's/early 90's Lego sets.

I've added more broken down Lego models to my MOC supply so the 260 originals are sharing space with some more of their friends.


Here are some close up shots of the engine and inner hinge system I employed.  The yellow engine is a Bricklinked piece I picked up loose and first appeared in Timecruisers where it is an exclusive color, I never acquired the theme as a kid and mostly remember admiring it in catalogs.  I picked up the yellow engines specifically for Blacktron MOCing. 


The Blacktron logo had to go somewhere so it went on the engine.  This engine is version 2, during the initial build I slapped something together and hated it so much this MOC was almost never photographed.  But on the third take I specifically rebuilt the engine based on the general outline of my first design, and I'm pretty happy with it.


The wing was the first part of the design and it, along with its frame has survived the modifications mostly intact.  I did add the camera cannons to it when I removed them from the gap behind the cabin's side windows in favor of Renegade's 2x2 striped tiles.  I also added the 8H antenna during the MOC's second incarnation.  I'd broken down another MOC and so it became available.


Here is a closeup of the classic era hinges that push the engine out.  These are the 2x4 over 2x8 variants, and the hinge base terminates into a 1x6 technic brick the engine is pinned onto in the engine's second version... Initially I built the first engine directly onto the hinges.  The printed stripe slope passes between the gap in the frame, and so the design gap is not stylistic invention.  It's there of necessity.


Here's a closeup for the wing.  The tile is removed as with the handlebar plate in Renegade, but in this case it's to let the wing fall.


The technical limitations of the era are no match for a determined swing wing builder!


In back I've got some of the odd shape pieces doing the job of pressing against these inverted slopes so the engine can't swing down past the frame when the wing is locked.  I had a more tightly fitted design that accidentally put stress on the parts so I had to redesign it to hold properly.


Version one of this ship was a solid body and very miserable to build, because I was building on a design with a fragile flopping wing, and an engine that often swung out and upset my balanced grip.
Version 2 started when I broke 50 percent of the ship down into parts and opened up the rear frame to make a technic mount point.  At that point I simply matched the shaping of a new seperated cabin design to stick to it and focused on building a piloted cabin with a large lower window section that would sit between mandibles. 


The first canopy design was Battrax canopy over Renegade canopy as with Space Police 2 stackover method.  But I thought the design should be more sophisticated, so I busted out the trans yellow panels from Cosmic Fleet Voyager and hinged them.  Here's a top down view.


The Lower windshield had a wide open space so I set up an instrument panel so the pilot could look down.  This was a great opportunity for me to use a handful of Classic Space transparencies for the first time so I went to town building a delightful cockpit.


The trans green 1x1 plates are a Blactron element taken from Invader and I wanted to imitate the sort of interior night mode look I inferred from the original design.  Behind the pilot I had some unused open space, so I set in a removeable box.  Initially it was black, but also in Invader fashion, I replaced it with gray to give myself a better photography situation.


You'll notice I use a bit of grey here and there... there is gray in the Blacktron color scheme in trace amounts, and here I took inspiration from the engine in Nautica theme's Dark Shark, which I had as a kid and still have... minus some stickers and heavily played with.


Nautica Dark Shark  This was my first set with black visors and given that I missed Blacktron by a few years as a kid... it had to cover for the accident of a mistimed birthyear. 😉


That's my take on the Mantis.  I hope you enjoyed it.

Sincerely, The Cure-all Pill


Monday, April 13, 2020

MOC: Blacktron Robots

This week in a month in a year I've got a new Moc Post for my readers.

If you follow my Facebook page you'll have seen these models and I apologize, there's nothing new here except my personal commentary.

I built a Blacktron robot

The idea was quite simple.
I have a pirate Lego piece and I must use it.
Yellow Wedge, Plate 8 x 8 with 4 x 4 Cutout - via Bricklink

I also used a Bricklink sourced antenna in yellow since they were never made in transparent red... ahem Lego company... hint hint!  I want some.  (since I started working on this post almost a year ago!!! I got my hands on some... 😄 ...) go to bottom of post.


The model has a bit more grey than your typical Blacktron model and perhaps a bit too much yellow as well.  I was also a bit put off by the leg design I made based off the Alienator walking mechanism.   Which is why...


I built a second robot!


This robot was prompted by a conversation I was having with my brother via text.  I was staring at my Lego and blanking so I asked him for a prompt and he said build a mining mech.

6 hours later I replied back to him.  You will please notice that it is hinged in the back under the large very fancy dome.  It took a while to get that fitted and attached in a satisfactory and balanced looking manner.  I actually started with a different taller wire cage design that didn't pan out.  Think Power Miners but with old Space parts and you've got an idea for this robots abandoned design.


The trans yellow pennant is a spare purchased from Bricklink and the color scheme was started generically.  In the end I built it in the Lego Batman movie colors.  My few yellow bits were a bit tied up on a then assembled yellow submarine and underwater base.


The model is hinged with 2 hinge styles that were very common in the 90's and so can do some fun poses.


 It is a robot design that aims to please.  Charmed no?  But wait there's more !
I did eventually break down my underwater base and submarine to get those little yellow Blacktron bits and redid it in purist Blacktron colors.  I was prompted by a follower over on the Facebook page Futuron of My Youth.


Right as I wrapped up the color swap on my Mining Mech... which is kinda crab like and seems more like a sentry robot I started fiddling with some of my other Bricklink spares.


Vehicle, black Tipper End Flat with Pins -via Bricklink  The first appearance of this bit was in 1969!  But black didn't show up til much later; in 1970.  The part was still getting used when Classic Space showed up but by then it was really just a yellow construction theme piece.  The earliest sets it appeared in were part of the 4.5 volt train collection.  There is still a variant of this piece, without tipper pins, in use today.


I like to build these Futuron of My Youth MOC designs with a heavy emphasis on parts that a kid would reasonably have had a chance to have or have inherited from family in the era they were new or recent toys.  I like to show off how technically sophisticated or aesthetically cool these older parts can be.  This tipper bucket end was only used for tipping buckets and the pins aren't quite as big as average minifig utensils but they fit between 2 studs and would rest in there just waiting to be playfully tipped.  I realized while I was fiddling that they can make a triangle if you tie them together with plates.

Blacktron has triangles... you see where I'm going with this yeah?


So anyways.   I only had 2 so I couldn't make a full triangle, but I could start one and I built a yellow chair to hide behind my two thirds upside down triangle.  And when I'd finished the top I was like... if only lego men had triangle pants.  Not really... I was thinking, now what?


And so I built a robot.  A mean nasty robot who breaks M:Tron stuff!


I took design prompts for the leg chassis from Life on Mars bipedal robots and then went all chicken walker on it with classic plate hinges and technic bits.


So my robot has a claw, a laser cannon with a wrist mounted rocket launcher, tube adjusted arms and pose-able legs.


And it can walk.  I've always had an incredibly hard time building aesthetically pleasing and functional walking robots so I feel very lucky with this one.


It's a pitch perfect balance at rest and essentially leans back ever soo slightly, which works out because it's slightly nose heavy.


It can even continue standing with a raised cockpit, though it will topple if the cockpit travels too far forward.  Oh yes, I also bricklinked some yellow angled window frames to use in Blacktron MOCs... as you can see at the back of the chair.

.


It's a Jailbreak!  You can go to Facebook page Futuron of my Youth to see the Full Space Police MOC these robots are attacking.


And with a nod to the greebles I sign off... Have a good day.


Sincerely, the Cure-all Pill
A brief note given my infrequent posting. I mostly finished up reviewing Blacktron prior to 2019 after hitting major blog burnout, all the appreciation I've since been shown for my blog came after I finished my main goal of reviewing these 4 Space themes in full.... The rest of these posts are fun asides until I have another theme ready... I currently don't have another full theme to review.  My Internet access has become much more limited since late 2017 and I've prioritized other uses for it.  My avenues to upload photos from my camera phone also all went away because I'm technologically tied to an outdated platform and all the ways I know to upload from it no longer work.  And speaking of ways, here's THE BIG BAD ONE my backup plan to sit at a local restaurant and upload photos from my phone via my laptop didn't account for Covid 19!!! ... I like this hobby, and I love that a tiny fanbase of this blog has developed and pops in to ask where the new posts are.  This post was finished to answer the prompting inquiries.  Thanks for the enthusiasm!

BEHOLD!!! 4 Transparent Red Antennae... And a Spyrius set remade in the SeaTron Color scheme.


I made some changes to the model based on part limitations of the 260 era... and some Bricklinked bits I like using.